Monday, May 20, 2013
IKEA Trofast kids storage revamp
Who ever has enough storage? Nobody I've ever met anyway. Good storage solutions are always a blessing I think.
This storage is part of the playcorner solution... I know! Don't even mention it...it's taking forever. But hey, I'm making progress which is an absolute miracle with a cruising baby around my feet, a household to run and a part time job to hold down.
Also have you tried painting or any DIY while you're baby is around? My GOD! Chaos. He grabs the paint brush, drops his toys in the paint bucket then takes it out and crawls away, touches everything that is freshly painted and gets very upset if you try to stop him. So consider all this if you are thinking of getting DIY done with a baby... but then just do it anyway because however frustrating the situation is, the memory of it is sweet.
Back to the point, here is what I did with this great storage solution from IKEA. (IKEA better start sponsoring me soon, I'm making a pretty good commercial for them all the time.)
The reasons I bought this piece:
- by pure luck it is the perfect size for my corner
- okay price. not cheap, but okay
- solid wood frame
- blank canvas to customise
- the light weight plastic boxes are easy for baby to drag around the house
- and they are also handy for me to drag around and throw everything in it to tidy
up quick
Originally I was gonna get an old chest of drawers in Oxfam or in the flea and upcycle it to a toy storage chest, but I realised this will be easier and more practical for this time of our life.
And here is how I did it:
1) Firstly, because it is comes lacquered (pity), I applied a primer onto it to be able to paint on directly
2) I next painted the outside with a wall paint called 'book room red' and the inside with a colour called 'olive green' (both Farrow & Ball sample pot paints)
I choose subtle colours because the wall it's going against is a dark muddy green which dominates already. However if it was going against a pale wall I would have gone with a strong red, or glossy orange or deep dark colours like muddy grey or back.
3) with a water based varnish I sealed the paint
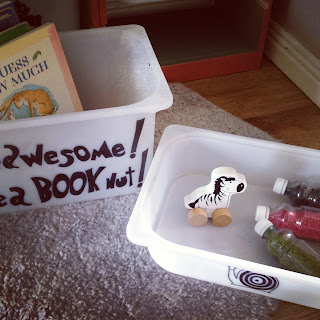
4) I selected funky designs and 'Dr Seuss' quotes from the Internet and copied them onto both sides of the boxes with a permanent Sharpie marker
A note on Dr Seuss. My friend (who is a South African children furniture designer coming out with her first collection soon, coolest person ever and one of my greatest inspirations) introduced me to Dr Seuss who I never heard of before and was not part of my Hungarian child hood. I love how he is super intelligent and his books have messages for kids and adults alike.
Note: the quote on the photo is a bit messed up, it doesn't read as well as I wish: "Be Awesome, Be a BOOK NUT."(It looks a bit more like "Bed Wesome, Bed Book Nut") I confess it was late when I did it while watching "The Office" with the husband and I rushed it. Ah well... I can live with it.
What do you think? You could do so much with the boxes. You can get actual stickers or use coloured markers. Also if you aren't that handy copying by eye the boxes are quite see through so you can just pop the right size of image on the inside and draw over it. Does your child have a favourite book? Get a box, stick a page of the book under, draw over and you'll be the coolest mom on the block :) Older kids could do it themselves, couldn't they?
Just a quick reminder to like the facebook page if you haven't already. I post loads of cool design inspirations on there on a regular basis... See you guys soon
Subscribe to:
Post Comments (Atom)


oooh I love this!
ReplyDeleteI have been thinking about painting our wooden trofast too. It just needs sprucing up a bit since it now sits in our family room... you have inspired me!
Hey katepickle, that is brilliant, great to hear! I would love to see it when you finished, would you send me a pic? Let me know if you need any technical advise I can help with. Best of luck
Delete